Telephony
Telephony icon  , located in the lower left corner of the agent window, shows the status of the voice server: , located in the lower left corner of the agent window, shows the status of the voice server: - server is connected,  - "Do not receive incoming" function is enabled, - "Do not receive incoming" function is enabled,
 - connection to the telephony server is prohibited in the settings, - connection to the telephony server is prohibited in the settings,
 - the client can not connect to the telephony server. - the client can not connect to the telephony server.
The context menu items on this icon allow you to connect / disconnect to the voice server, open the call center window on the call history tab or telephony settings, enable / disable the function "Do not accept incoming calls". WINDOW "CENTER OF CALLS" Call Center allows the user to make calls, view the call history, set the phone settings. You can open the call center window by clicking on the "Call" tile on the Main page, or by using a combination of hot keys (Alt + B). The Call Center window displays the history of the last 100 user calls. 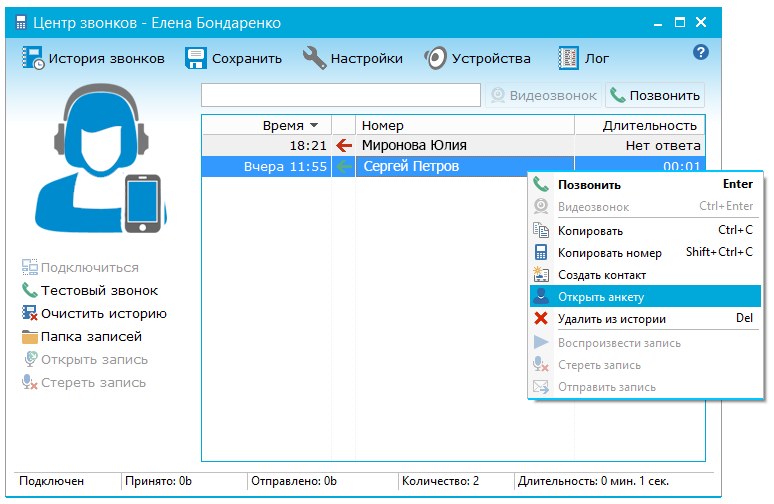 Calls are listed in chronological order. For each record, the date and time of the call, the name of the user (subscriber) or phone number (if the call is external and the number is not recorded in the system), as well as the duration of the call are indicated. The record icon shows the direction of the call:  - Incoming call; - Incoming call;
 - Outgoing call; - Outgoing call;
 - Missed call. - Missed call.
The rows of unanswered calls, or conversations that lasted less than 7 seconds, are highlighted in gray. Above the list of calls is a search string. Search is performed by phone number or user name. Also, using this field, you can make a call by entering the phone number in the international format (+ 7 ...) and pressing the "Call" button. By double clicking on the entry (Enter), you can make a repeated call to the subscriber. The "Video call" button allows you to make a video call to an internal user. To carry out a video call, both web parties must have a webcam connected. The options on the left side of the window are: - "Connect" - activates the voice server. The user can make internal calls and calls to external numbers;
- "Test call" - the user can check the correctness of the settings and the quality of communication by making a call to the test center of the "Simple Business" system. When making a test call, the user should hear a greeting, after which to leave his message. If the user does not hear the greeting or his message, check the settings of the telephony (speakers and microphone);
- "Clear history" - erases records of recent calls;
- "Records folder" - opens a folder containing all audio files of recorded conversations;
- "Open Record" - the recording of the conversation selected in the history is played;
- "Erase record" - deletes the call record of the call selected in the history.
The context menu for the selected user provides the following functions: - "Call" - makes a call to the selected subscriber;
- "Video call" - carries out a video call to the selected subscriber;
- "Copy" - performs copying of information about the call;
- "Create contact" - allows you to fill in data about a new contact and save it in the user's contact list;
- "Open Questionnaire" - opens the window of the profile of the selected user;
- "Delete from history" - deletes the selected user from the call history;
- "Play Record" - the recorded conversation with the subscriber is played;
- "Erase record" - the recorded conversation with the subscriber is deleted;
- "Send Record" - allows you to move the recorded audio file to a task.
On the top panel there are buttons, clicking on which opens the corresponding windows: Call history window The Call history window displays information about all external calls of the organization. With the help of filters located on the right, you can sort the history according to the specific conditions: organization, time period, individual gateway, call status and on the user of interest. It is also possible to search for a particular phone number. o display the history of the specified parameters, click the "Find" button. To reset the filtering, the "Reset" button is provided. The "Cost" column displays the cost of calls made through the default gateway provided to the organization. 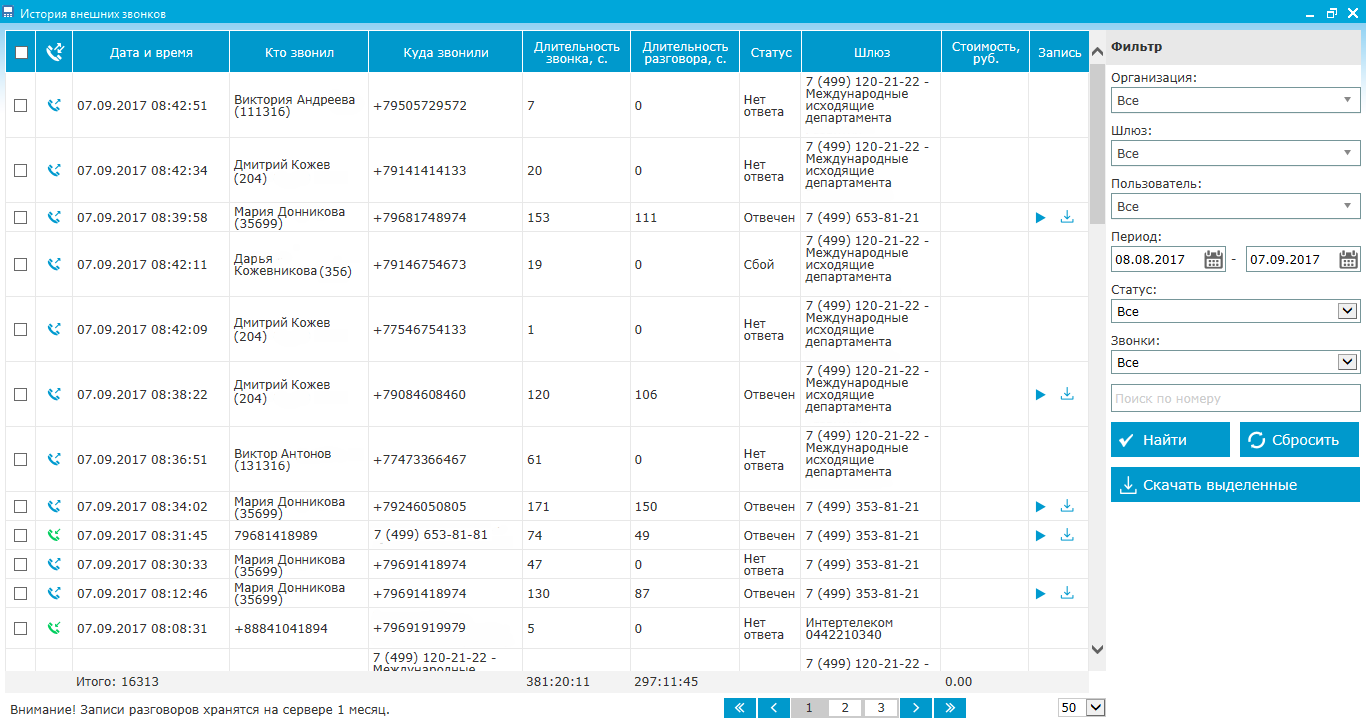 Settings window Allows the user to set up voice communication 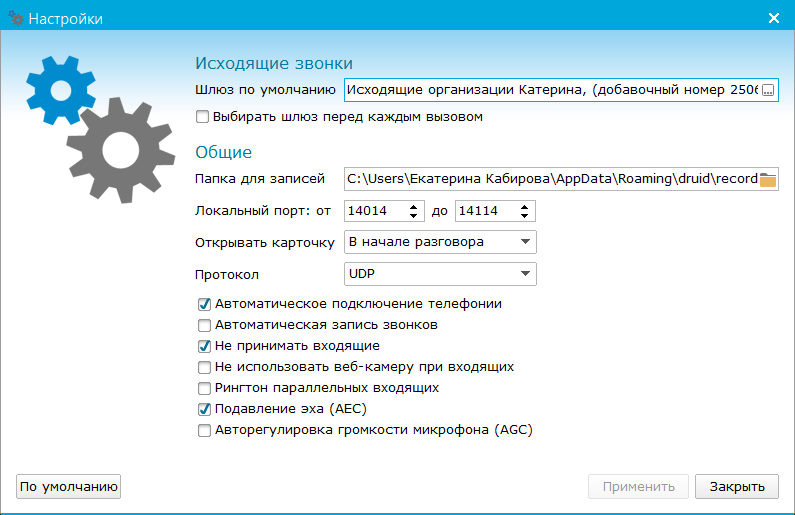 - "Default Gateway" - the drop-down list displays the gateways that are available to the user. All external calls will be made through the selected gateway;
- "Select gateway before each call" - when this option is enabled, before each external call, the phone gateway selection window will appear automatically;
- "Folder for entries" - indicates the path to the folder in which the records of telephone conversations will be stored. By default, this is the Records folder located in the program folder;
- "Local port" - indicates the port number or range of ports through which the connection to the telephony server occurs;
- "Automatic connection of telephony" - connection to the voice communication server will occur automatically (if the connection is broken);
- "Automatic call recording" - when the option is on, all conversations are recorded;
- "Do not accept incoming" - when the option is turned on, incoming user calls will be ignored, while the user can make outgoing calls;
- "Do not use the webcam with the incoming" - when making a video call, the image from the web camera will not be transmitted to the interlocutor (even if the webcam is connected);
- "Parallel incoming ringtone" - allows you to enable / disable the ringtone for a parallel incoming call;
- "Echo cancellation (AEC)" - the option helps to get rid of the echo from transmitted sounds to improve the quality of voice over the phone;
- "Auto Microphone Volume Control (AGC)" - the volume is adjusted automatically;
Devices window In this window, the user can specify the required voice communication devices, set up, check their operation. 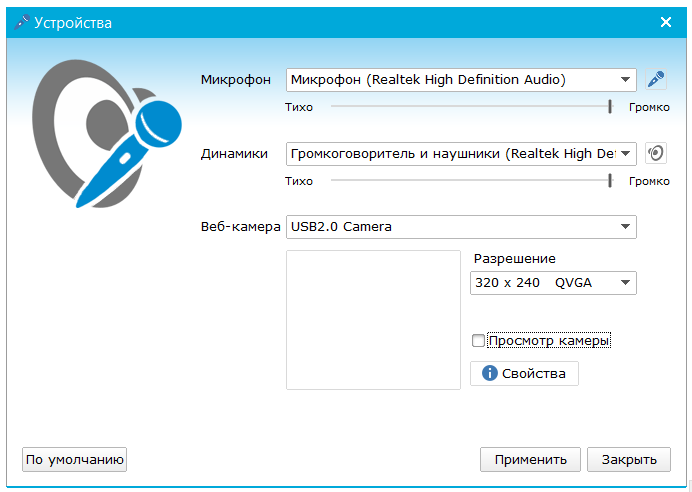 "Microphone", "Speakers", "Web Camera" - from the drop-down lists are selected devices for recording, playing sounds and video images. To the right of the fields with the names of the selected devices ("Microphone" and "Speakers") are buttons for checking their operability. Below are the sliders that control the volume of the devices. The "Camera Preview" option is required to evaluate the video image that will be transmitted to the interlocutor. Window of a voice call By default, the voice call window is presented in a minimized form, where only the "Accept call / Ring", "Reject / end call" buttons, and the "Hide from list" button are available to the user. In the extended version of the window, the user is provided with a set of tools for managing current conversations. To get the extended version, it's enough to focus the window and perform a single click on it. If the focus is lost, the window returns to the minimized view again.  Assignment of buttons located on the top panel: - "Conference" - the user can create voice conferences and negotiate simultaneously with several people. This option combines available parallel calls to the conference;
- "Connect" - opens a window for selecting a user or contact that will be connected to the conference or to a parallel call (thereby forming a conference call). The user can also connect an arbitrary external number. To do this, enter the telephone number (in international format) in the user / contact selection window and click the "OK" button;
- "Forward" - redirects the incoming call to another user. You can divert an incoming call after it has been received. In the call forwarding window that appears, you can select the user or contact to which the call will be sent. When the option "Only on the network" is enabled, only those users who are currently on the network will be listed. You can also redirect to an external number - in the upper window select the required number (in the international format) in the user / contact selection window;
- "Dial" - opens a field for entering an extension (during an outgoing call) or a user number for redirection (in the case of an incoming call). To forward the call, enter # and the user ID to which the call will be sent. The user ID can be seen in the information window in the lower left corner.
- "Record" - a telephone conversation can be recorded and saved as an audio file. The conversation will be recorded from the moment you select the "Record" option and until the end of the call or cancel this function. If the call was recorded, then in the history opposite the record of the call will appear the speaker, by clicking on which the user can listen to the received audio file. All entries are saved in the records folder specified in the Call Center settings.
- "Settings" - opens the call center window on the "Settings" tab where the user can change the volume of the microphone and speakers, adjust the communication quality;
- "Hold" - the ability to put the line on hold during a call (this button is located to the left of the user's icon);
- "Speaker Volume" - the volume of the speakers can be adjusted using the slider located in the lower left corner of the call window, as well as using the scroll.
The context menu duplicates some of the items described above. Also, through the context menu, the user can perform the following actions: - "Disconnect the microphone" - during the conversation the user can turn off his microphone for a while, so that the interlocutor can not hear it. You can also turn off / on the microphone by clicking on the microphone icon located in the lower right corner of the voice call window;
- "Default recording" - activates automatic recording of all calls;
- "Hide from list" - hides the window of the user who left the conference, the window of the completed parallel call.
Video call window To receive a video call, use the button in the voice call window "Accept video call":  The video call window displays the picture of your subscriber. In the lower right corner, your image is displayed. 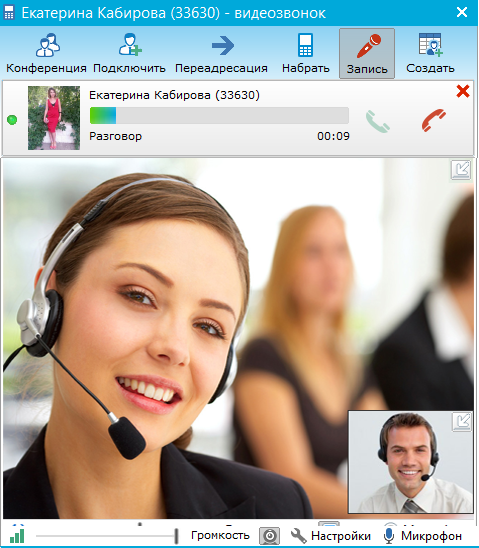 If you want, you can hide the area with your image or image of the subscriber. During the conversation, you can disconnect / enable the transfer of your video using the "Disable / enable video" button on the bottom of the window. HOW CAN I CALL TO ANYONE OR ANY EMPLOYEE FROM A CONVENIENT PHONE? In order to call someone from a regular phone, dial +74952291166. After the sound menu appears, enter the extension number - this is the number displayed in the lower left corner of the employee questionnaire you wish to call: 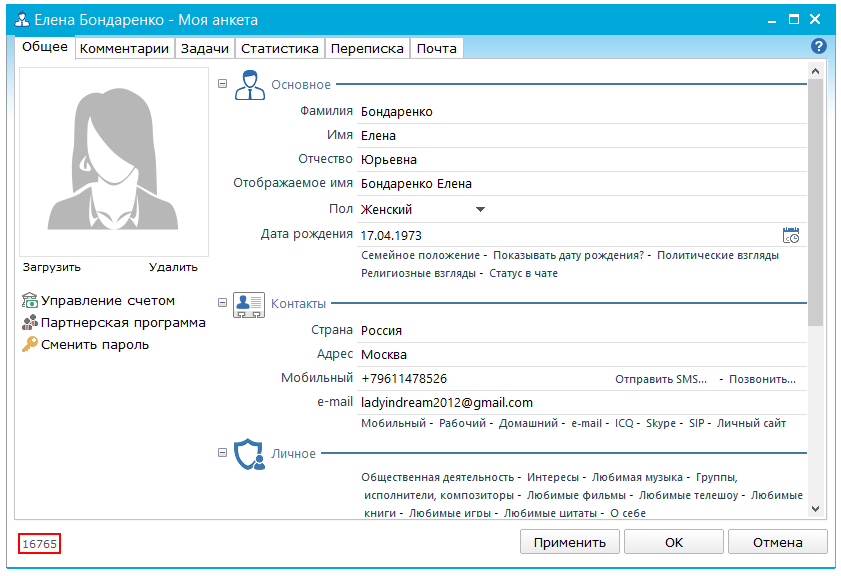 HOW CAN I CALL TO MY ORGANIZATION FROM A CUSTOM PHONE? In an organization that has a default phone gateway, you can call from a standard phone by dialing +7 (495) 212-15-62. After the sound menu appears, type the number (ID) of your organization on the keyboard that appears in the lower left corner of the organization window. 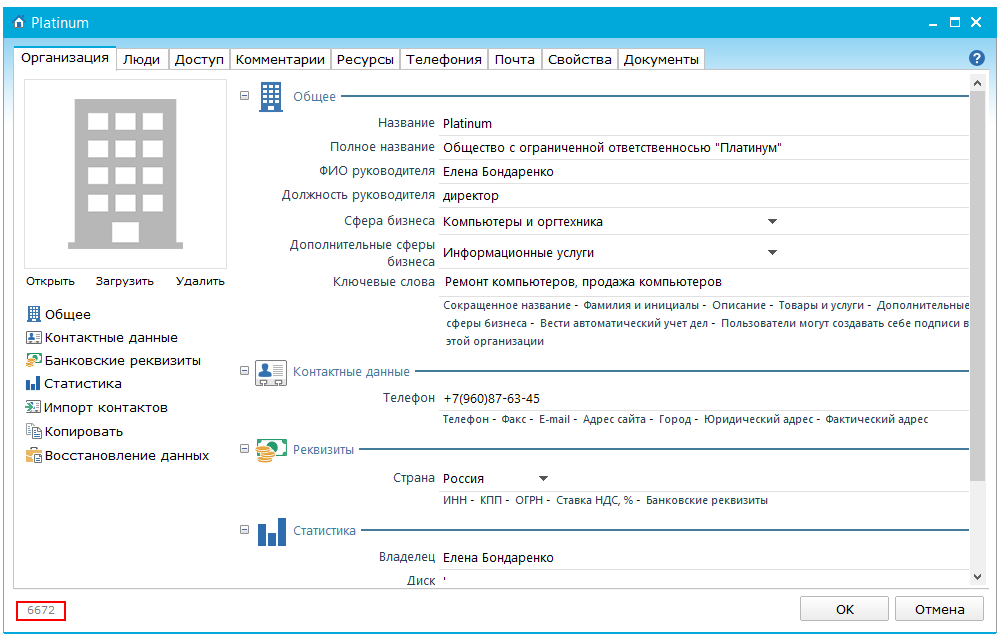 The call will come to the employees of your organization, in accordance with the specified rules for accessing incoming calls. By default, access to incoming calls is only open to the owner of the organization. If your organization has the status of "Professional Organization" or "VIP" and you have created other telephone gateways behind which telephone numbers are assigned in international format (+ 7499 ..., + 38050 ... etc.), you can also call your organization to these numbers in accordance with the established rules for accessing incoming calls. HOW TO CONNECT YOUR PHONE NUMBER TO THE TELEPHONY OF "SIMPLE BUSINESS"? The ability to connect the accounts (numbers) of any sip-provider to the telephony of "Simple Business" is granted to the owner and administrator of the organization within the limits of the tariff "Professional Organization" and "VIP Organization". To connect your account (number), open the organization window on the "Telephony" tab, use the "Create" - "Gateway" button (more ...). In the window that appears, enter the account information (in the figure below, the data for accounting [email protected]/password is entered). The user sets the name of the gateway arbitrarily. In the field "List of telephone numbers" you can enter the numbers assigned to this account. 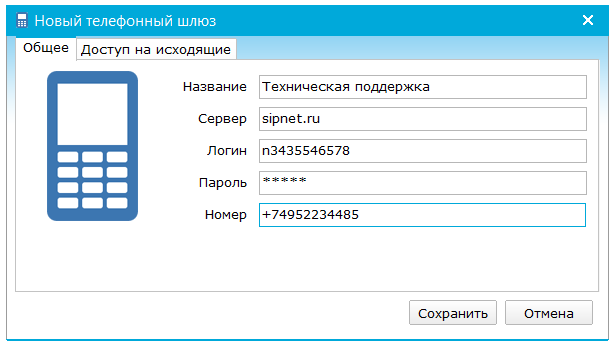 Click "Save" and then on the "Ok" window. Your account (number) will connect to the telephony. The default gatekeeper receives rights to make outgoing calls. HOW DO I GET THE RIGHT OWNER CALL FROM THE CORPORATE NUMBER? The owner or administrator of the organization can grant the right to call or receive calls to the corporate number. To grant the employee the right to call from the corporate number, open the window of your organization on the "Telephony" tab. Go to the gateway editing window (double-click the name of the gateway or Enter), on the "Outgoing access" tab, tick the employees who want to be given the right to call from this telephone gateway (number). 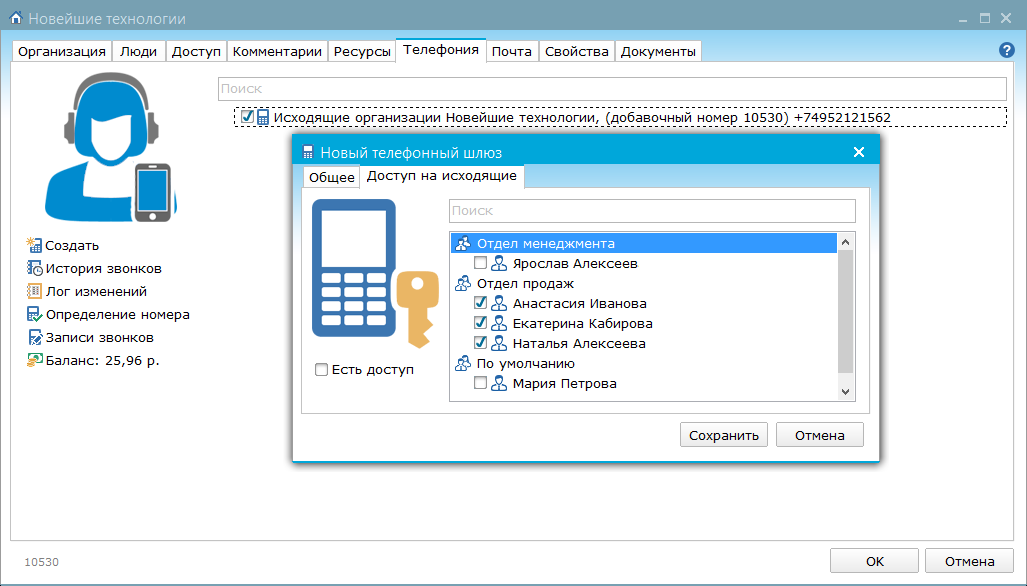 Then click "Save", then "Ok" on the organization window. HOW DO I GET THE RIGHT OWNER ACCEPTING THE CORPORATE CALL NUMBERS? In the organization window on the Telephony tab, highlight the gateway, use the "New" button - "Inbound rule". 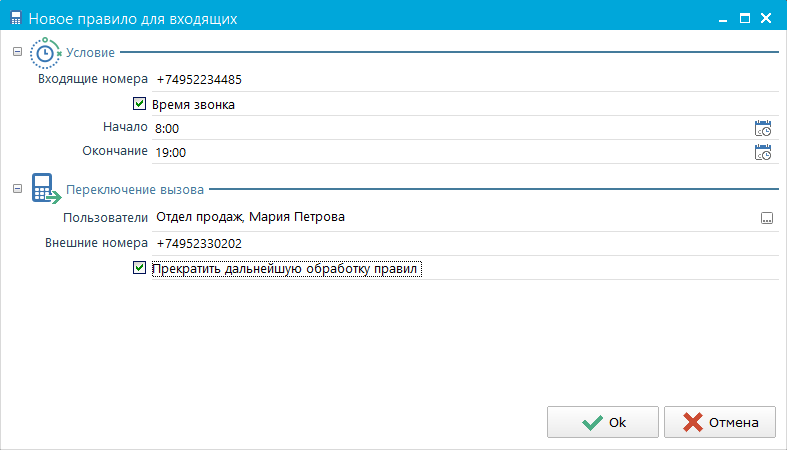 In the window that appears, you can set the rules for incoming calls: "Incoming numbers" - you can specify the phone numbers (in international format) to which this rule will apply; "Call time" - sets the time period during which calls will be received according to this rule; "Users" - users who will receive calls will be marked; "External numbers" - you can specify the external phone number to which you want to transfer incoming calls; "Stop further processing rules" - activation of the option allows you to make this rule unique for the specified conditions, i.e. in the event that any incoming call will be suitable for the conditions for both this rule and for another, then another rule for this call will not work. Then click "OK" to save the rule, and "Ok" in the organization window. HOW TO CHOOSE FROM WHICH ISSUE TO CALL, IF MULTIPLE? To select the phone number (gateway) for making an outgoing call, open the Call Center window on the Settings tab. In the "Default gateway" field, click the button in the right corner of the field. In the phone gateway (number) selection window that appears, select the desired gateway and click "Apply".  In order for the window to select the telephone gateway to appear automatically before each external call, you can activate the option "Select a gateway before each call". HOW TO CREATE A TELEPHONE CONFERENCE? To merge several current concurrent conversations, there is a "Conference" button in the voice call window or in the context menu. 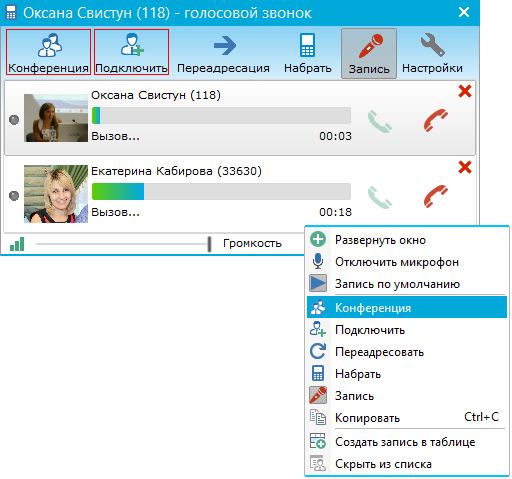 If during a conversation with a subscriber (or several in a conference) you want to call another one by connecting it to the conference, use the Connect option. In the window that appears, select the user / contact or enter in the upper field an arbitrary phone number (in international format) of the subscriber you wish to connect to the conference. You can disconnect the conference, leaving all the current lines active. To do this, click on the activated Conference button and select No in the window that appears ("End all calls in the conference?"). Yes - disconnects simultaneously with all subscribers.
|