Internal chat
Chat allows you to contact any user who is in the organization or is in the group "My friends". This feature is implemented in the user's window on the "Chat" tab. The transition to chat is also possible via the context menu function of the user "Communication" -> "In chat" (Ctrl + Enter). You can also write to the chat room for users who are not in the contact tree. You can add a user using advanced search. Messages from the chat that arrive to the user are displayed in the tray with an icon in the form of an envelope.  By clicking on the envelope icon, a chat window with the other person will open. 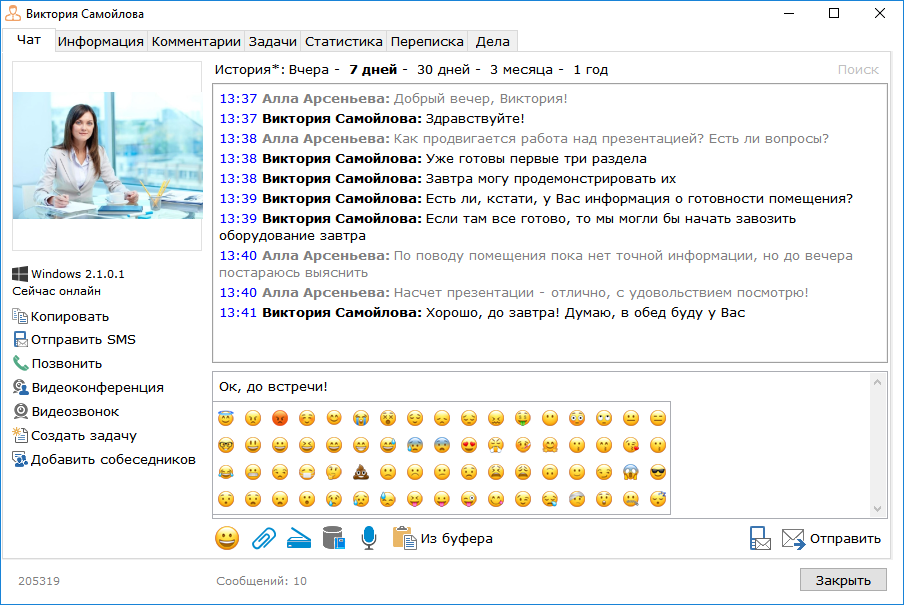 Button  - allows you to select a smiley and insert it when chatting through chat. - allows you to select a smiley and insert it when chatting through chat. Button  - allows you to send an SMS message to the user. - allows you to send an SMS message to the user. Button  - opens a window for selecting a file. The attached file will be displayed in the input field of the message as a link. Also, to transfer the file, you can simply drag it to the chat window. - opens a window for selecting a file. The attached file will be displayed in the input field of the message as a link. Also, to transfer the file, you can simply drag it to the chat window. Button  - allows you to add a scanned document. - allows you to add a scanned document. Button  - allows you to add information from the database. - allows you to add information from the database. Button  - opens the audio recording window. - opens the audio recording window. Button  - allows you to add to the chat data from the clipboard. - allows you to add to the chat data from the clipboard. Under the user's photo there is information about the client, from which the user last corresponded, and also the version number of the client. Under the user's picture there is a panel with buttons for the following functions: - Copy - copy all available information about the user from the "Information" tab;
- Send sms - by clicking the window opens sending SMS to the user;
- Call - upon pressing, the internal call to the user number starts;
- Videoconference - opens a video conference creation window;
- Video call - upon clicking, the video call window is opened for the user;
- Create a task - by clicking on it opens a window for creating a new task assigned to the user;
- Add interlocutors - allows you to add interlocutors to the correspondence and create multi-chat.
The user can view the history of correspondence by using filters above the correspondence window ("yesterday", "7 days", "30 days", "3 months", "1 year"). When you select a filter, messages will be downloaded for the corresponding period. To find the necessary information in the history of correspondence, use the "Search" field in the upper right corner of the window. When you enter text, the list of messages is filtered accordingly. Messages sent to the user who is offline at the time of sending are highlighted in gray. The color selection will be removed when the user appears online and receives messages from the chat. The user can also transfer comments from the chat to any task open to him or to the record history of the table by clicking on the comment and selecting "Move to task" in the context menu. In the opened window there are two tabs: "To task" and "To table", where the user can select the desired task or record table. In the program settings, the user can enable / disable chat functions such as displaying notifications, turning on notifications about typing, sending messages in the chat when the Enter button is pressed. You can also enable / disable some functions in the context menu of the correspondence window: sound notification by messages, the option "Always scroll to the end" - when new messages are received, the focus will move to them from any point of correspondence. The user can also set a reminder for the message in the chat. This function will help the user not to forget about an important message and coordinate their actions on time. It's enough to set the reminder time by the message, and the notification will notify you about it at the right time. To set a reminder for the message, you can use the context menu, which is called by the right mouse button on the message in the chat window. 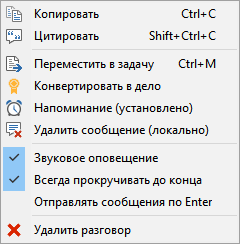 The user selects the message in the chat window, and then selects the "Reminder" item from the context menu. This opens a window in which the user sets the reminder options. 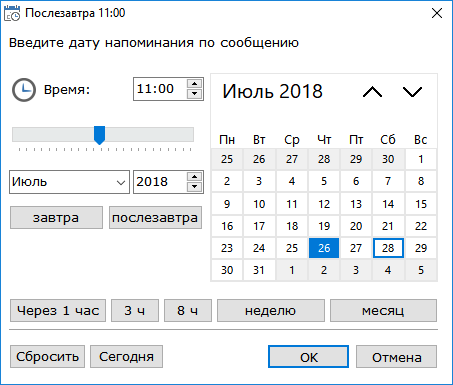 The user can set the date and time himself by specifying the time in the "Time" field and selecting the date in the calendar located on the right side of the reminder window. The user can use the standard buttons to set the most frequently used reminder options: "Tomorrow", "The day after tomorrow", "After 1 hour", "3 hours", "8 hours", "Week", "Month", "Today" After setting the date and time in the title of the reminder window, the date and time of the installed reminder will be displayed. Reset the date and time settings by clicking on the "Reset" button, saving the settings by clicking on the "OK" button, canceling the settings using the "Cancel" button. After setting a reminder, the message in the chat is highlighted in color. 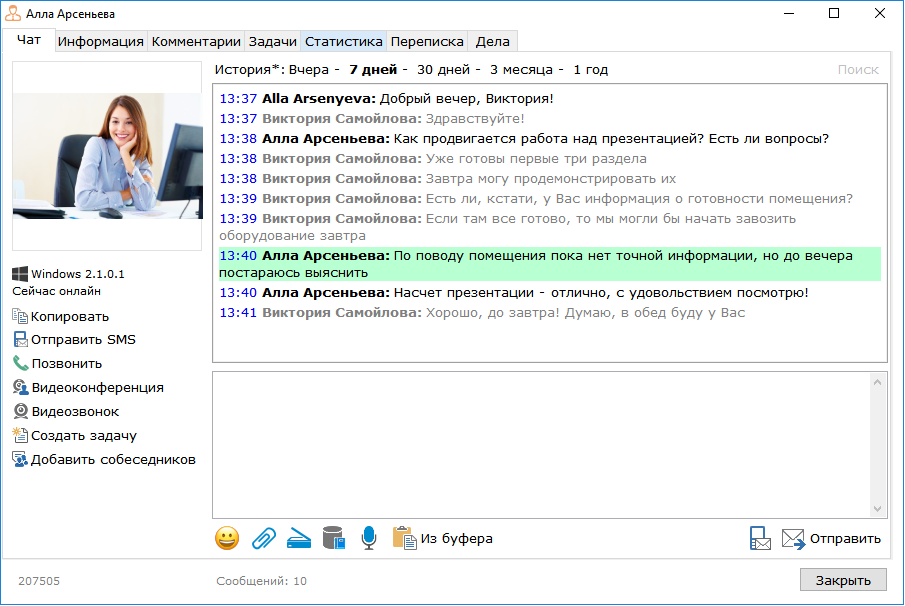 When the specified reminder date comes, the user will be notified by chat messages. 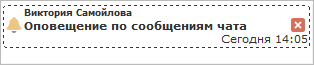 The message text is indicated in the notification hint. Double-clicking on the notification window opens a chat window with a message and opens a notification biasing window in which the user can pause the reminder time of the message. 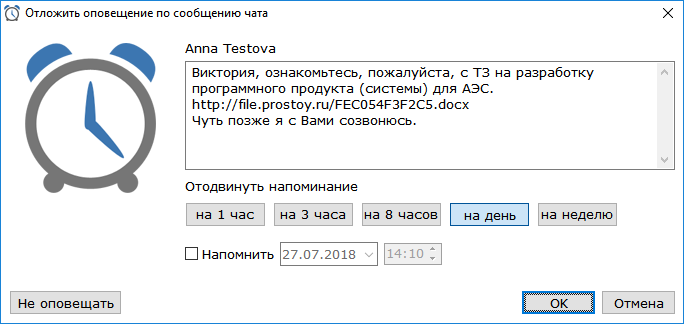 The user can pause the reminder for the selected number of hours or set the date and time of the reminder by putting a checkmark "Remind". To uncheck a comment, use the "Do not notify" button.
|