Page
FORMATTING

On the toolbar of the text editor there are a number of tools with which you can edit the contents of the page.
The following tools are available on the panel:
- headline of the first level. To make the text as the first level header, you must put the cursor at the beginning of the text and press the H1 button (Ctrl + 1);
- the second level header. To make the text as the second level header, you must put the cursor at the beginning of the text and press the H2 button (Ctrl + 2);
- plain text of a paragraph. In case you need to cancel the text formatting, put the cursor at the beginning of the text, press the P button (Shift + Ctrl + N);
- the outline is bold (Ctrl + b);
- italics italic (Ctrl + i);
- underlined underlined;
- undo the previous action;
- return the previous action;
- left alignment;
- center alignment;
- right alignment;
- alignment by width;
- window for inserting a local or external link (Ctrl + ?);
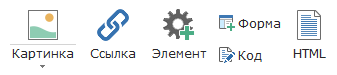
- insert an image from a file, scanner or camera;
- adding a html-code to the page;
- adding a form to the page;
- insertion of an intelligent element;
- superscript text;
- subscript;
- inserting a note for the page;
- copy selected text;
- insert text from the buffer;
- cut the selected text;
- text search;
- replacing the text;
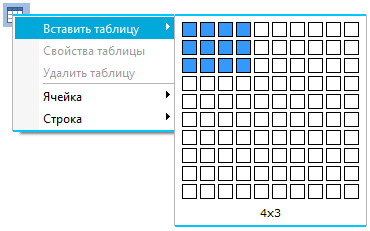
- inserting a table;
- editing a table;
HOTKEYS
When working with the site, it is possible to perform basic operations using hotkeys:
Menu section "Site":
- Update (Ctrl + U) - updates the site content;
- Save (Ctrl + S) - saves changes on the site;
- Publish (F5) - publishes data from a local computer to a website on the Internet;
- Exit (Alt + F4) - shutting down the Prostoy CMS.
Menu items in the "Page" section:
- Add (Ins) - add a new page;
- Delete (Del) - deletes the selected page;
- Next (Ctrl + PgDn) - opens the next page;
- Previous (Ctrl + PgUp) - opens the previous page;
- Print (Ctrl + P) - opens the print preview window of the current page.
* Button "Exit" - the completion of the Prostoy CMS.
- Hide properties (F8) - hides / opens the page properties panel.
Hot keys in the main editor window:
- Toolbar (F6) - hides / shows the toolbar;
- Navigation (F9) - closes / opens the site structure on the left side of the window.
- Editor view (F10) - opens the content editor of pages;
- Viewing HTML (F11) - opens the html-code of the current page;
- Page View (F12) - opens the results view.
* The "Navigation" button opens / closes the structure of the site in the left part of the window.
To place links on the site, the function "Add link" is implemented.
You can create a link based on the text entered in the editor (hyperlink). To do this, just select the text, in the editing panel select the item "Create link". In the "Link" window that appears, select the "Local" item and select the page in the list to which it will link. In the "Link title" you can enter text that will appear as a tooltip when you hover over the hyperlink.
In the "Type of link" field, you can select its type "Ordinary" or "Major". When selecting the "Majestic link" function, the link will include the title of the page to which it leads, a brief description of the page and its icon, if it was set.
The "open in new window" setting is available in the window. If you select this function, when you click on a link in the browser, the page it refers to opens in a new tab. This setting applies to all the link site.
If this window was not called to create a link, but to edit an already created one, you can delete this link by selecting "Delete link" in the panel.
In the context menu of the page, you can select the item "Add as link", and this page will be displayed as a link in the editor field.
EXTERNAL LINKS
To add a link to an external resource, in the link creation window, just switch to the "External" tab and enter the address of the page to which, when this link is selected, a transition will be made.
PICTURES
The "Insert picture" option is available in the editing panel. It is possible to insert pictures with the extension png, jpg, jpeg, gif, bmp, img, etc.
Here are the items:
- Paste from file - opens a window in which you can select an image that is stored locally on the computer or on a portable device, is currently connected to the computer.
- Paste from scanner or camera - if a scanner or camera is connected to the computer, the pictures directly stored there can be pasted onto the page in the editor.
- Paste from the buffer - if the user pressed the Print Screen or copied the image in the image editing program, it is stored on the clipboard and can be pasted onto the page by selecting the item of the same name. The image is inserted into the internal image editor, where it can be cropped, corrected, or immediately, by clicking on the "Finish" button, paste on the page of the site.
Adjust the position of the image on the page and make an image reference by double clicking the left mouse button on the image.
HTML INSERT
For users who know the HTML language, you can add content in the CMS editor in this format. To add any html code to the page, just click on the "Insert HTML" button.
HTML-code is prescribed in the opened "HTML Editor" and when you click on the button "Ok" is added to the page of the site. In the editor, this insert is displayed in the form of an icon. To edit this insert, just open the editor window by double-clicking the left mouse button.
The left bottom of the HTML Editor window displays the unique identifier for this insert. It can be copied and pasted into the theme template.
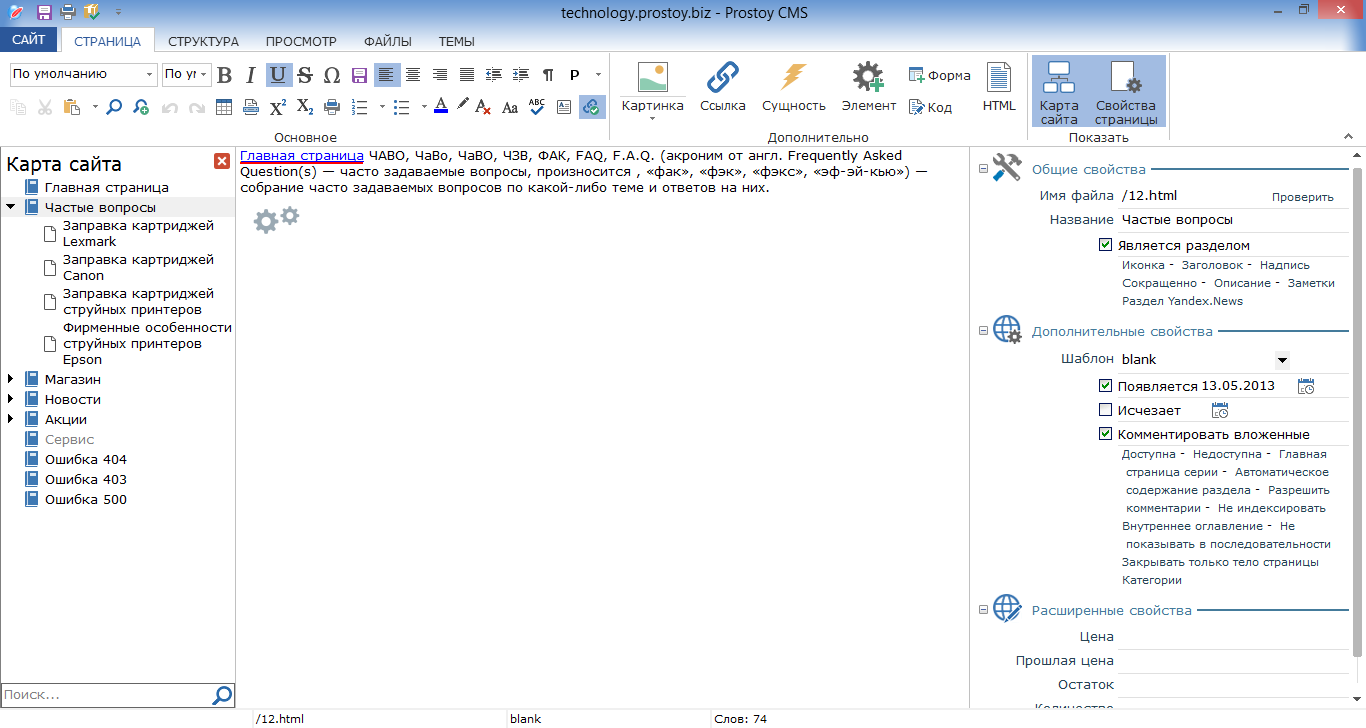
ADDITIONAL PROPERTIES OF THE PAGE
- Template - drop-down list, in which you can select a template for the page.
- Appears - adjust the appearance of the page. If you remove the daw, the page will be accessible only locally, and visitors to the site will not see this page. This setting can be useful when you want the page to appear at a specific time. At the same time, it prevents the appearance on the site of pages unfinished in terms of design and content.
- Disappears - a function inverse to the option "Appears". This is the date the pages are hidden on the site. After the user marks this option, the date entry fields become active. You can fill in the date yourself, select the date from the calendar or set the current one. To set the current date, it's enough to select "Today" in the appeared calendar.
- Available / Inaccessible - a window opens with a list of user roles and you can specify which page will be available / unavailable to whom.
- The main page of the series - if you enable this setting, all nested pages will inherit the blank field name or description, as well as the next / previous fields.
- Automatic content of the section - if the current page has nested pages, when this item is selected, links to these sub-pages will be displayed on this page. The links include the title of the page, a short description and an icon if it was specified.
- Comment nested - this function is available only for partitions. If you put a daw, you will be able to comment on the pages attached to the section. On the section itself, commenting is connected using the
- "Allow comments". Allow comments - connect comments on the site of the selected page.
- Do not index - if this option is selected, the page will not be indexed by search services such as Yandex, Google, Bing (search engine from Microsoft), Yahoo, etc. Turning off indexing avoids falling of the search service rank if specific materials are used on the site page, for example information about tobacco, alcohol products and others.
- Internal table of contents - displays the table of contents of the internal sections of the site.
- Do not show in sequence - even if the parent has an "automatic section content" added to the current page, this feature allows you not to display a link to the current page in the list of sections;
- Closing only the body of the page - the page will not display the body, i.e. its contents.
- Categories - an item for selecting the category of the page.
|